

I’m back from the dead to update you guys on the progress of the Vulkan port. In the last update, I went over how I set up the G-Buffer pass and the groundwork for the port. I honestly forgot to write a blog post over the last 3 months, but massive progress has been made. I also haven’t worked only on Vulkan, but on various different systems like modularizing the codebase, reworking the resource system, and much more. I will write dedicated blog posts for those.

Amazon Lumberyard Bistro
Splash screen
I improved the splash screen when loading a project, which should give the editor a more polished look. I’d like to take an actually good splash screen instead of this testing one I used. Maybe eventually allow projects to define their own splash screen per project — I think that’d be neat.

Render pipeline abstraction
The first major improvement I made was a render pipeline abstraction. It’s a modular system where you can create render pipelines with any number of passes, all while managing transition layouts, push constants, and render target management. It also includes a neat render command abstraction, making it easy to manage more complex pipelines. Of course, I’d also like to expose this to the modules API. This would allow anyone to create their own custom render pipeline.
Here’s how it currently looks:
struct MyPushConstant
{
  int textureID;
}

MyPushConstant pushConstant = { .textureID = 1 };

// Create a render pipeline object
auto renderPipeline = RenderPipeline();

// Add a pass to the pipeline
auto& myPass = renderPipeline.AddPass("FullscreenPass");
myPass.SetShaders(shaderMgr.GetShader("shader_vert"), shaderMgr.GetShader("shader_frag"));
myPass.SetPushConstant(pushConstant);
myPass.AddAttachment("PassOutput", ImageFormat::RGBA8);
myPass.AddInput("MyTexture");
myPass.SetPreRender([&](PassRenderContext& ctx)
{
	auto& res = GPUResources::Get();
	pushConstant.textureID = res.GetBindlessTextureID(MyTexture->GetID());
	ctx.commandBuffer.PushConstants(ctx.renderPass.Layout, sizeof(MyPushConstant), &pushConstant );
});
myPass.SetRender([&](PassRenderContext& ctx)
{
	Cmd& cmd = ctx.commandBuffer;
	auto& layout = ctx.renderPass->PipelineLayout;
	auto& quadMesh = VkSceneRenderer::QuadMesh;

    // Render fullscreen quad
	cmd.BindDescriptorSet(ctx.renderPass->PipelineLayout, quadMesh->GetDescriptorSet(), 1);
	cmd.BindIndexBuffer(quadMesh->GetIndexBuffer()->GetBuffer());
	cmd.DrawIndexed(6);
});

// Build pipeline
renderPipeline.Build();
Now that we’ve built our pipeline, it should be ready to go and render into textures.
auto renderTarget = CreateRef<VulkanImage>(ImageFormat::RGBA8, Vector2(1280, 720));
// Optional: Will be named in NSight/Renderdoc
renderTarget->SetDebugName("FullscreenRenderTarget");

// One array of rendertargets per pass.
// In this case, we only have 1 pass with 1 render target
PipelineAttachments pipelineInputs
{
	{ GBufferAlbedo  },	// Fullscreen Pass
};

{
  	// Optional debug marker for NSight/Renderdoc
	auto marker = ctx.commandBuffer.DebugScope("Fullscreen pass Execute");

    // Render into render target
	GBufferPipeline.Execute(ctx, pipelineInputs);
}
After making this system, I can finally start making iterations to the render pipeline without too many headaches. I’d say this is even easier to work with than my OpenGL renderer. So I started porting each pass by simply adding more and more render passes to the pipeline.
PBR Shading
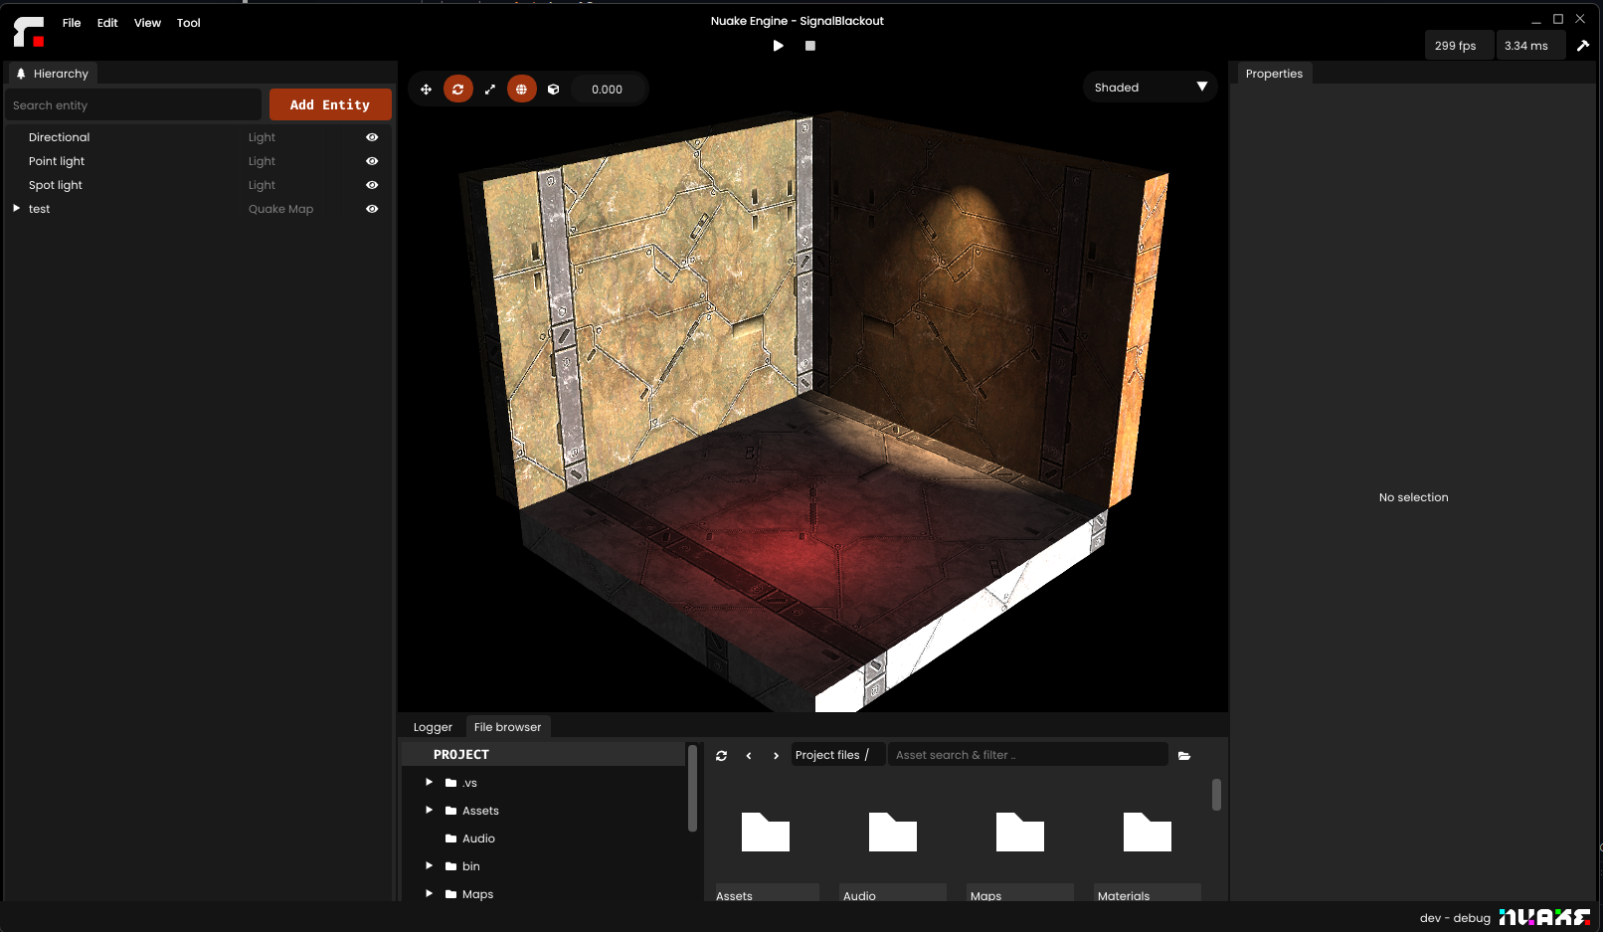
The first thing I did was, of course, the PBR shading pass. This entailed a couple of different things—I needed to have my lights visible on the GPU as well as my “Views.” Views are a new concept; they simply describe a view in the scene. Not only cameras, but also anything that represents a point of view in the scene, like lights. Each light has a ViewID that describes where it’s looking. This is useful to have for shadow mapping, for example. Having every resource available in bindless buffers makes it incredibly simple to render the scene from different perspectives. I can simply pass in a different ViewID in my constant buffer, and the scene will be rendered from that View. It doesn’t even know what a camera is, just views.
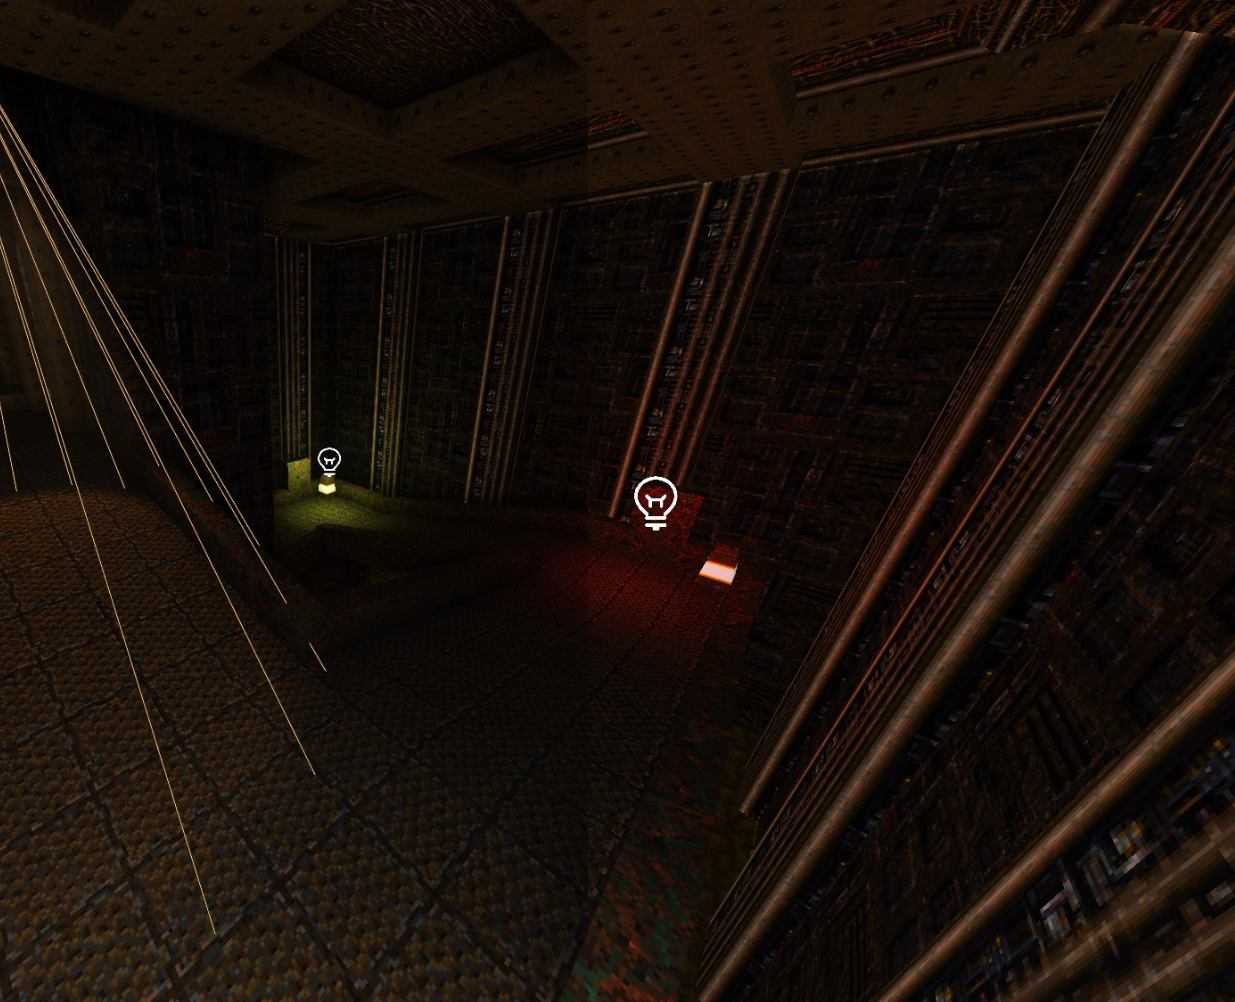
Anyway, back to PBR shading. I went ahead and added all types of lights (directional, spot, and omni).
https://docs.antopilo.dev/api/attachments.redirect?id=2ad3cf5e-f963-4410-b45c-df492cb4a5a0
api/attachments.redirect?id=9188d5e7-2969-4405-b539-cd360b83dcf9
Shadows & CSM
The next step was adding shadows back. I started with directional light shadows and then added cascaded shadow maps. It was a bit awkward at first getting used to reverse-Z and the new Vulkan coordinate system, but I eventually made it work. I’d say it’s even more stable now as well.
Viewport System
I made a viewport system that allows you to register viewports linked to cameras. This makes it super easy to do multi-scene rendering. It’s an important feature to add early on, since a lot of other features will build on top of it (foreshadowing). Currently, you have to ask the renderer to create a viewport for you, which will return a viewport handle. The viewport will be the owner of the final render target it renders to.
Ref<Scene> scene; /* get whichever scene you want */;

// Get a scene camera/editor camera
const UUID viewId = scene->GetCurrentCamera()->ID;

// Get an instance of the renderer
auto& renderServer = RenderServer::Get();

// Ask the renderer for a viewport associated with the camera/view
auto viewport = renderServer.CreateViewport(viewId, Vector2(1280, 720));
renderServer.RegisterSceneViewport(scene, viewport->GetID());

// Optional delegates to draw lines/shapes only in that viewport
sceneViewport->GetOnDebugDraw().AddRaw(this, &ViewportWidget::OnDebugDraw);
sceneViewport->GetOnLineDraw().AddRaw(this, &ViewportWidget::OnLineDraw);
Material Preview
To put the new viewport system to the test, I decided to implement a couple of features that would require the system to be in place. The first one was to somehow embed a second viewport in the editor. After porting the regular viewport widget to use its own viewport instead of a hardcoded render target, I decided to try a material preview widget. I already had a panel for editing materials, but there was no way to preview the changes unless they were already present in the scene. So I created a viewport with a scene that displays a 3D shape with the material applied to it. It worked perfectly and only took 15 minutes to get it working nicely.
I also improved the material system with new options. It's now possible to set the culling type, various shadow options, alpha testing with a threshold, unlit mode, etc., as well as specify which texture sampler to use. Overall, it should be much more flexible.
You can change the preview shape using the icon in the top-left of the preview window
Camera Preview
Since the viewport system takes in a scene and a ViewID, it was super simple to add a camera preview in the properties panel. Just like the material preview, I passed in the same scene as the viewport widget, but with the selected camera’s ViewID if the selected entity has a camera component. It worked flawlessly!
If you’ve ever wondered what the “Editor”(you) looked like? You can now see yourself in the preview.
I know this is stupid, but I like it
Multi-scene editing
I went ahead and refactored the whole scene editor into modular widgets and windows. I also had to create some kind of docking space for the scene editors. I found that the multi-scene editing in the Godot engine was pretty neat, so I added that. Now, every scene editor has its own context, which makes all actions in the editor localized per scene editor.
The new layout will allow me to develop other tooling windows and organize them in the same dockspace.
SSAO
The SSAO pass has also been ported. I'm not totally happy with how it looks right now, but I plan on implementing AMD’s FidelityFX soon enough to have state-of-the-art effects.
Left is with AO - Right is without AO
Volumetric Scattering
Volumetrics have also been ported, with some new improvements compared to the OpenGL renderer. All light types can now contribute to the volumetric pass, along with some noise options. By default, the volumetric pass will be at 1/4 resolution, with a depth-aware blur. This means the upscaling will try to keep sharp edges when compositing over the shaded render target.
It's now possible to specify some noise parameters to add a bit of variety to the density of the scattering. You can customize the scale, speed, and strength of the noise. I also added a base contribution factor to add volumetric scattering to occluded spots in the scene. It was a bit jarring to go from foggy to absolutely no fog at all in the shadows.
For now, it’s not froxel-based, so it’s a bit taxing performance-wise. I plan on improving it after I’m done bringing the renderer back to where it used to be.
Outlines
The outline pass is back! It’s also animated if you want some editor juice. It also plays nicely with the gizmo system.
I eventually want to make a module that adds editor juice. Just for fun.

https://docs.antopilo.dev/api/attachments.redirect?id=7177b538-b37a-4c8f-9dd7-d06363e859f2 https://docs.antopilo.dev/api/attachments.redirect?id=e3d07c9b-4481-41ca-afff-2c8238573db8
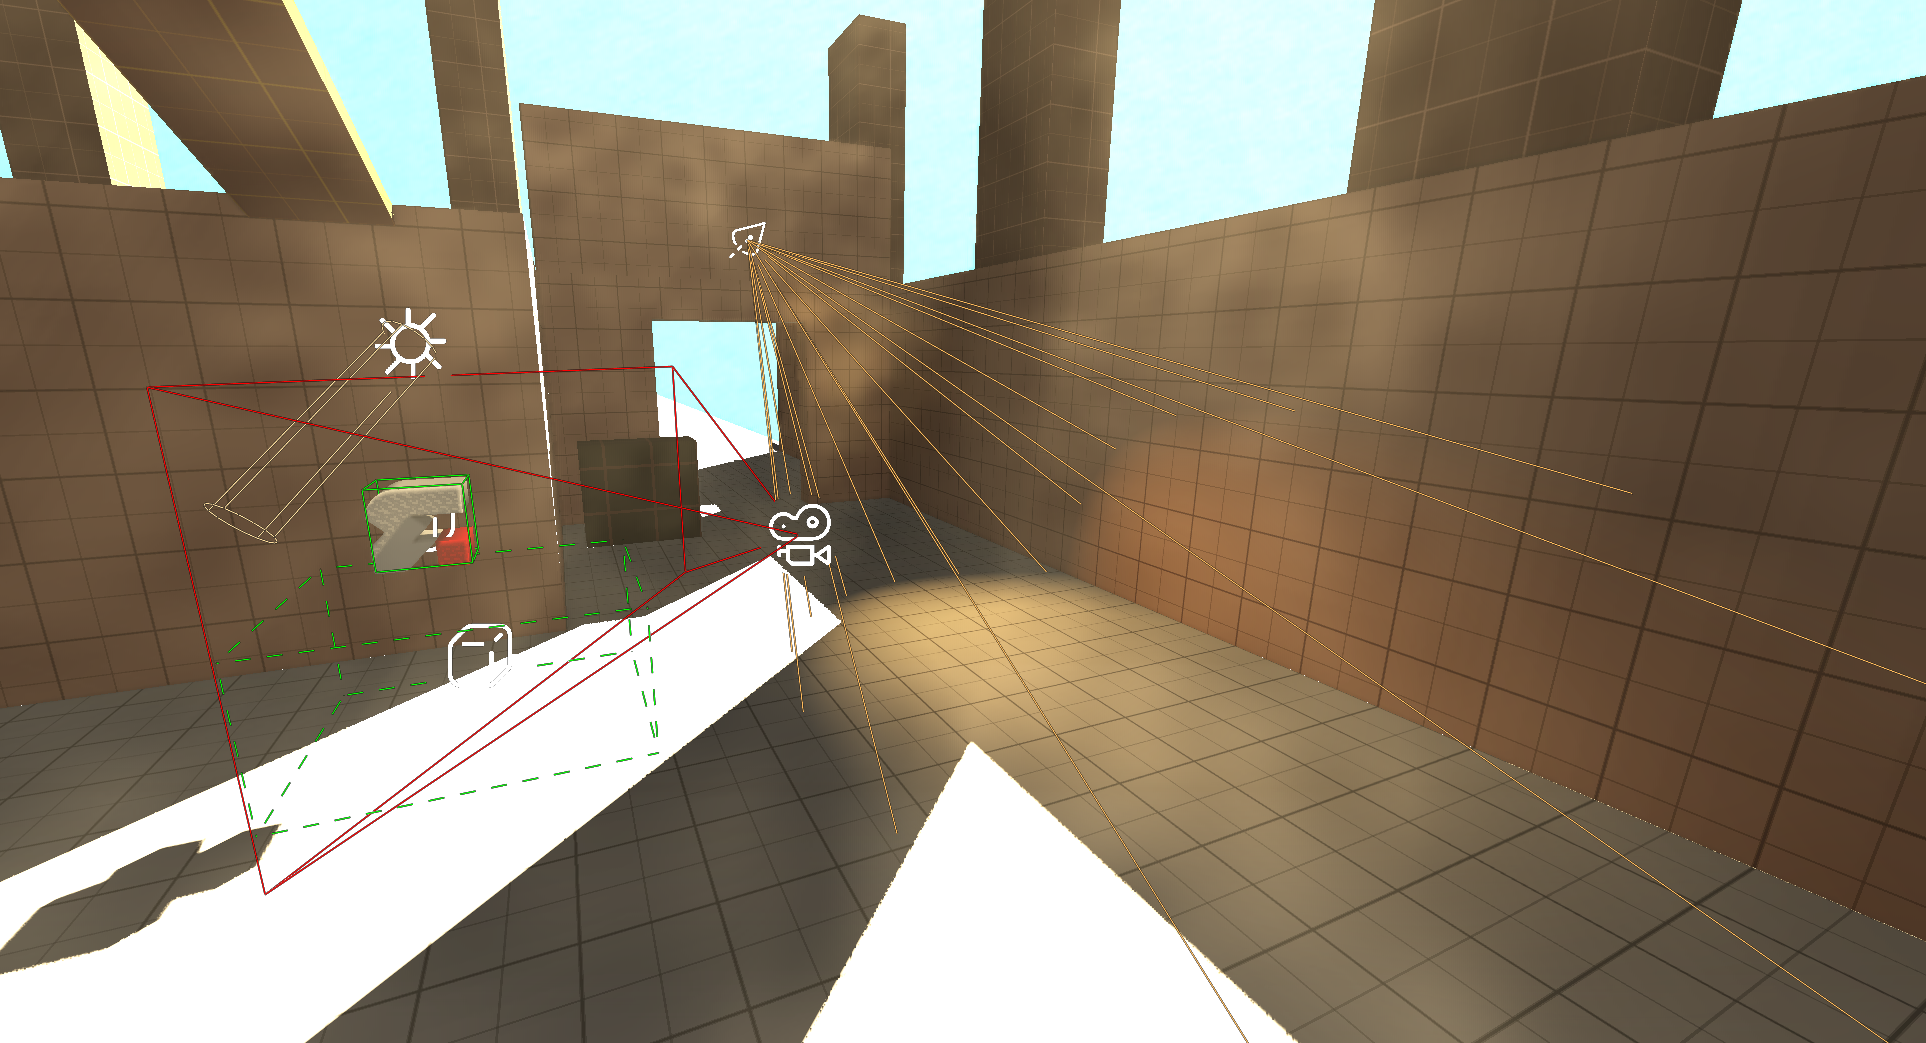
Gizmos
Gizmos are back, and they’re better than before. I’m also using the Vulkan 1.4 Line rendering extension, initially released for CAD applications, but it works nicely for Nuake. It allows me to make stippled lines, which are fitting for non-solid shapes, as well as inactive entity links. I also made the gizmo use the selected color when it’s selected.
Live-reload of baked assets
I also added live-reloaded assets for the renderer. It uses a generic asset resolver system, so it should work for all assets. I plan on writing about the asset baking and resolving system in a separate blog post. It’s a great system inspired by OpenUSD. It should work for all assets going through this system and automatically updates all RIDs in the engine to the newly imported asset.
There is a blog entry in progress talking about the asset pipeline. It's one of the areas I'm most proud of.
Modules & Assets
That’s it for current state of the Vulkan port. Of course, a lot more has changed internally and I figured I should keep this blog post a bit lighter on technical stuff, to make room for the next blog entry. I will go in-depth about the modularity of the engine. There’s also a lot to talk about regarding the new asset resolving and asset importing systems.
See you soon, Antoine 👽